
How to Save Redeployment Time Using Clojure
Imagine you wrote a piece of software, it was deployed, and then it turned out there is a bug in it. You want to fix it, but there is a problem...

.png")
Artist concept of Deep Space 1 firing its ion thrusters. The image is in public domain.
.png)
Imagine you wrote a piece of software, it was deployed, and then it turned out there is a bug in it. You want to fix it, but there is a problem: the hardware your software runs on is located at a distance of 60 million miles.
It would be a miracle if this bug could be fixed. Indeed, it was fixed, and the miracle is called Lisp. According to the developer of that software Ron Garrett, it was the features of Lisp that allowed him to rescue the Deep Space 1 probe.
I am a regular software developer in the banking and telecom sectors. But on several occasions, I faced a problem that seemed similar to that of Ron Garrett.
The problem
Sometimes you have a large application which takes a long time to build and deploy. In one bank, I had a situation where a Maven build took thirty minutes and a local deployment another twenty.
In a European telecom company, the full build and deployment took about two hours to complete.
This causes various problems.
One of them is this: If you have a large Spring-based application (tens of thousands of beans) and you need to figure out how something works, you need to:
modify the code,
rebuild and launch the application,
look how it behaves,
modify the code again, and
repeat steps 2–4 until you've achieved your goal.
If rebuilding and launching the application takes hours, it means you can make fewer experiments.
You could say that modifying a small piece of code in a running application takes as much time as sending a software update to a space probe at the other end of the solar system.
Alternative solutions
Sometimes you can isolate the problem in a JUnit test. Then you don't need to rebuild the entire application.
But in my case, this workaround was not feasible, because I needed to access the Spring context at runtime and inspect the data inside some of the beans.
Another approach is to use a tool like JRebel. But
in big companies it takes months to buy a licence, and you need to fix your issue yesterday, plus
there is no guarantee that a tool like this will work in the environment of the customer (e. g. because of firewalls and other security measures).
If you only want to change one particular Java class (and the JAR files are not signed), you could also
build the project locally, and
then replace the class file on the server.
I know at least one company which did this in production. This was of the reasons I left it.
Clojure to the rescue
One day, I was waiting for the rebuild and redeployment to complete. I remembered the story about Lisp in space.
It got me thinking: Could it be that my problem was somewhat similar to Ron Garrett's? In both cases, there was the issue of waiting time. NASA developers needed to wait for the signal to reach the probe or come back to Earth, and I was waiting for builds.
They solved the problem using Lisp. So, couldn't I solve my problem using the modern incarnation of Lisp – Clojure?
It turned out that I could. The process looks like this:
Create a Spring Bean with a Clojure REPL inside.
Put some initial code into a Clojure file inside the application.
Create a REST endpoint which calls the Clojure function whenever I call this endpoint in a browser.
Build and deploy the application.
Connect to the REPL from Visual Studio Code.
Call the endpoint and look at the results in the log file or its response.
Modify the Clojure code in Visual Studio Code and send the changes to the REPL.
Call the endpoint again.
Repeat steps 7 through 8 until the Clojure code behaves as you want it to.
Rewrite the Clojure code in Java.
In this scenario, the lengthy operation of rebuilding and redeployment takes place only once (step 4).
The changes to the Clojure code (step 7) occur at fractions of a second.
Below you can find a step-by-step tutorial on how to do this.
Tutorial
Step 1
Create a simple Spring project using the Spring Initialzr.

You can also git clone my sample project.
Step 2
Add Clojure and nREPL dependencies to the pom.xml file:
<dependency>
  <groupId>org.clojure</groupId>
  <artifactId>clojure</artifactId>
  <version>1.10.3</version>
</dependency>

<dependency>
  <groupId>nrepl</groupId>
  <artifactId>nrepl</artifactId>
  <version>1.0.0</version>
</dependency>
Step 3
Add a Spring bean which will launch the REPL.
package com.pravles.guestpost;

import clojure.java.api.Clojure;
import clojure.lang.IFn;
import org.springframework.stereotype.Service;

import javax.annotation.PostConstruct;
import javax.annotation.PreDestroy;

@Servicepublic
class ClojureRepl {
  @PostConstruct
  public void init() {
    final IFn require = Clojure.var("clojure.core", "require");
    require.invoke(Clojure.read("com.pravles.guestpost"));
    require.invoke(Clojure.read("nrepl.server"));
    final IFn start = Clojure.var("nrepl.server", "start-server");
    int port = 5555;
    start.invoke(Clojure.read(":port"), Clojure.read(Integer.toString(port)));
  }

  @PreDestroy
  public void shutDown() {
    Clojure.var("clojure.core.server", "stop-server").invoke(Clojure.read("{:name spring-repl}"));
  }
}
Step 4
Create a REST endpoint which calls a Clojure function and passes the Spring context as an argument.
package com.pravles.guestpost;

import clojure.java.api.Clojure;
import lombok.extern.sl4j.Slf4j;
import org.springframework.beans.factory.annotation.Autowired;
import org.springframework.context.ApplicationContext;
import org.springframework.web.bind.annotations.GetMapping;
import org.springframework.web.bind.annotations.RequestMapping;
import org.springframework.web.bind.annotations.RestController;

@Slf4j
@RestController("newDebugController")
@RequestMapping("debug")
public class DebugController {
  @Autowired
  private ApplicationContext ctx;

  @GetMapping("run")
  public Object run() {
    return Clojure.var("com.pravles.guestpost", "debug").invoke(ctx);
  }
}
Step 5
Create a file src/main/resources/com/pravles/clojureguestpost.clj with the initial Clojure code.
#_{:clj-kondo/ignore [:namespace-name-mismatch]}

(ns com.pravles.guestpost
  (:require [clojure.pprint :refer [pprint]])
  (:require [clojure.string])
  (:require [clojure.java.io]))

(import javax.servlet.http.HttpServletResponse)

(defn debug [ctx] "debug return value")
Step 6
Add a bean with one method that capitalizes a string:
@Componentpublic
class UpperCaseBean {
  public String upperCase(final String input) {
    if (input == null) {
      return "";
    }
    return input.toUpperCase();
  }
}
Step 7
Build and run the application.
Step 8
Open the URL http://localhost:8080/debug/run in the browser. You should see the text "debug return value" there.

Step 9
Install VS Code, if necessary.
Step 10
Install the VS Code extension Calva.

Step 11
Create a new project using Leiningen (lein new app) and open it in VS Code.
To do, select the menu item File -> Open folder.

There, select the directory with the application created by Leiningen.

Step 12
Paste the contents of file from step 5 into the file src/app/core.clj in VS Code.
Copy the file from step 4 into one of the folders of the project from the previous step.

Step 13
Connect VS Code to the REPL inside your Spring project.
To do, select the menu item View -> Command Palette.

A little text window will appear. Type Calva there, then select the item Connect to a running REPL server....
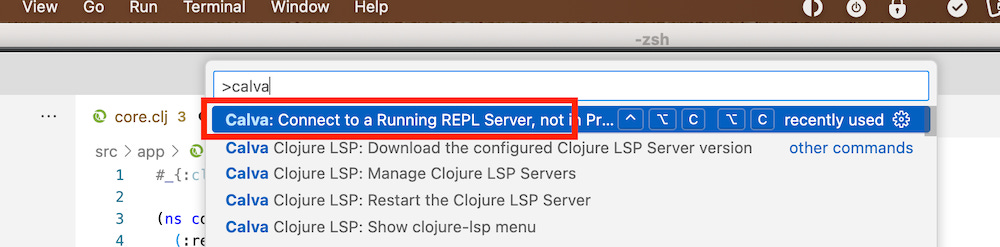
In the next window, select the Generic REPL type.

In the next window, enter localhost:5555 as the address of the REPL server.

After a few seconds you should see the message: Connected session: clj on the right side of the window.

Step 14
Modify the file from step 12 as follows.
#_{:clj-kondo/ignore [:namespace-name-mismatch]}

(ns com.pravles.guestpost
  (:require [clojure.pprint :refer [pprint]])
  (:require [clojure.string])
  (:require [clojure.java.io]))

(import javax.servlet.http.HttpServletResponse)

(defn debug [ctx] (-> java.util.Date (new) (.toString)))
Press Ctrl-A to select the contents of the file. Press Ctrl-Enter. This will send the changes to the function debug to the REPL in your Spring application.
You should see a text like => #'com.pravles.clojureguestpost/debug at the bottom of the window with the code upon successful update.

Step 15
Reload the page from step 6. Now you should see the current date and time in your browser.

This means that you've changed the code of your Spring application without rebuilding and redeploying it.
Step 16
Now let's retrieve a reference to our bean from step 6 from within Clojure. An instance of org.springframework.context.ApplicationContext is passed into our function. We can use its getBean method to retrieve the reference to the bean via its name.
bean (-> ctx (.getBean "upperCaseBean"))Then we can call its upperCase method and return the result:
#_{:clj-kondo/ignore [:namespace-name-mismatch]}

(ns com.pravles.clojureguestpost
  (:require [clojure.pprint :refer [pprint]])
  (:require [clojure.string])
  (:require [clojure.java.io]))

(defn debug [ctx]
  (let [date (-> java.util.Date (new) (.toString))
        bean (-> ctx (.getBean "upperCaseBean"))]
    (str "bean: " (-> bean (.upperCase "foo")))))
Press Ctrl-A and Ctrl-Enter to send the update to the Spring application.
Then, reload the URL http://localhost:8080/debug/run in the browser. You should see an output like this:

Conclusion
Now you know how to harness the power of Clojure in legacy projects. Did you use Clojure to work with legacy software in a better way? Share your thoughts in the comments.
About me
I work as a software developer during the day so I can work on my novel during the evenings. Visit pravles.substack.com to read completed parts of my novel for free. If you are interested in how writing fiction helped me become a better software developer, please leave a comment.
 | A guest post by
|